|
|
Electronic Case File Handbook Release 18-01 March 28, 2018 |

|
|
Electronic Case File Handbook Release 18-01 March 28, 2018 |
3.10.1 Introduction, Download, and Install
3.10.2 Saving Documents Before Removing Batches
3.10.4 Re-Importing Documents In New Batches
On occasion, a batch becomes corrupt and cannot be deleted in the Batch Manager. Before using this utility, please click on the Contact Us link below to contact DHS to troubleshoot the problem. If nothing else works, you can use this utility to delete a bad batch.
Right click on each of these links and choose "Save Target As" and save them to the C drive of the scan PC.
Instructions (Optional, PDF, 369 KB)
Batch Removal Utility (MSI, 577 KB)
If your agency will not allow you to download the .msi file, try downloading this zip file.
Batch Removal Utility Zip (ZIP, 215 KB)
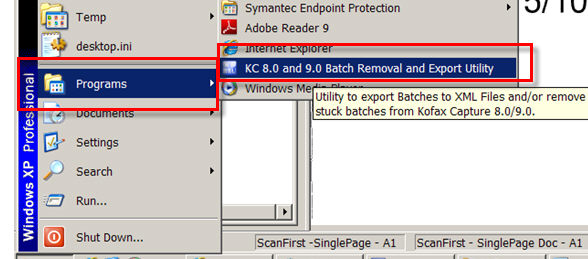
After unzipping the file, install the program. Go to Start> Programs> KC 8.0 and 9.0 Batch Removal and Export Utility. Click on the program to start the utility.
You have an option to save the documents that are in the corrupt batches to another place on the Scan PC. Or, if you have the original documents, you can rescan them instead. If you save the documents (they're .tif files) to the C drive you can import them into new batches. (See 3.10.4)
If you don't need to save the documents you are about to delete, skip to 3.10.3.
To save the documents in the batches you're about to delete:
Open the Batch Removal Utility. (Start> Programs> KC 8.0 and 9.0 Batch Removal and Export Utility)
Click on the Options tab.
Check the box called "Backup Batch Images."
Browse for a path where you want to save the images. They are .tif files.
You don't need to check any other boxes. To delete the batches, see 3.10.3.

To delete batches, make sure the Batch Utility is open.
Open the Batch Removal Utility (Start> Programs> KC 8.0 and 9.0 Batch Removal and Export Utility.)
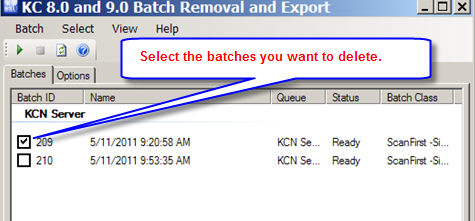
Click on the "Batches" tab if it's not already selected.
Select the batches you want to delete.
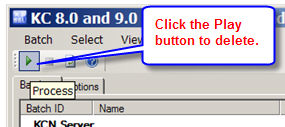
Click on the green "play" button to delete what's selected. If you chose to back up the files, they will also be backed up with this option.
The batches should no longer appear in the Batch Manager.
If you successfully saved the batches in section 3.10.2 above, each image is saved as a different .tif file in the folder you chose to save them.
See 2.14 Importing documents for instructions on how to add these documents to a batch and import them. You do not need to print and scan these documents.
This page last updated in Release Number: 11-05
Release Date: 06/07/11
Effective Date: 06/07/11