|
|
Electronic Case File Handbook Release 18-01 March 28, 2018 |

|
|
Electronic Case File Handbook Release 18-01 March 28, 2018 |
2.14.1 Importing Documents Introduction
2.14.2 How to Import Documents
Documents do not necessarily have to be scanned to be put in the ECF. Ascent Capture allows you to import documents that are already in a digital format. Many digital files can be quite large, so only documents of the following type are allowed:
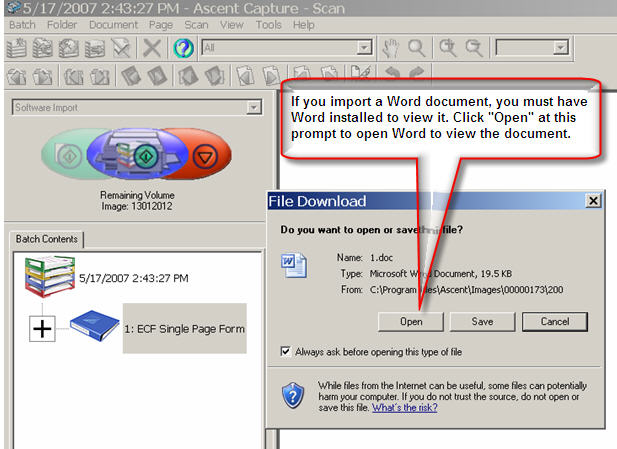
.doc (Microsoft Word) - Note: you must have MS Word installed to view a Word doc.
.pdf (Adobe Acrobat) - Note: you must have Adobe Acrobat installed to view a pdf doc
.tif (Tagged Information File, the default file type for Ascent Capture)
.jpg (Joint Photographer's Group)
.txt (text)
.rtf (Rich Text Format)
Microsoft Office 2007 prohibition
Files using the new 2007 Microsoft Office System XML file formats are created using new file name extensions (for example, .docx, .xslx, and pptx) are not supported by our current production version of Content Manager (ECF Viewer facility). The result is you can store these new file formats in the ECF but you will not be able to view them using the ECF viewer. For these documents, save them in the older file format such as ".doc" files and then import them. The next upgrade of Content Manager should eliminate this problem.
To import documents in the ECF:
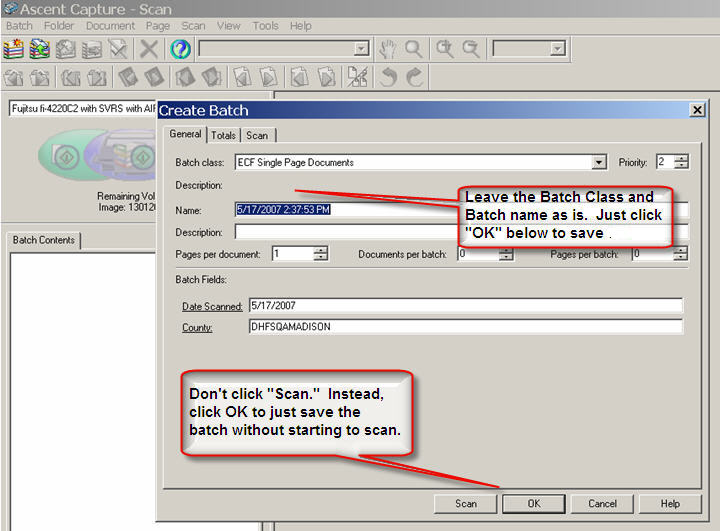
Open Ascent Capture's Scan module and create a batch and accept the default batch name. The batch class isn't important since you're not actually scanning. Don’t click "Scan" like you normally do.
Click OK to close the Create Batch Window. When you do this instead of clicking Scan, the batch is created but the scanner is not activated.
Change the scan source to "software import.”

Note: On rare occasions some users have reported receiving a "Host Processor" error. This error is the result of the software not configuring the image controls in a timely fashion prior to the operator initiating the importing of images into the batch. To avoid this error the operator should pause for 5 seconds prior to initiating the import process. If a "Host Processor" error is encountered, the operator should repeat the image import process until the error is no longer encountered.
Click the "Scan Batch" icon or go to Scan>Start from the toolbar at the top of the screen.

Either of these actions opens the folder/files to import. Remember to import documents that only belong to one case. If you need to import documents for another case, create a new batch for that case's documents.
Click "Add.”
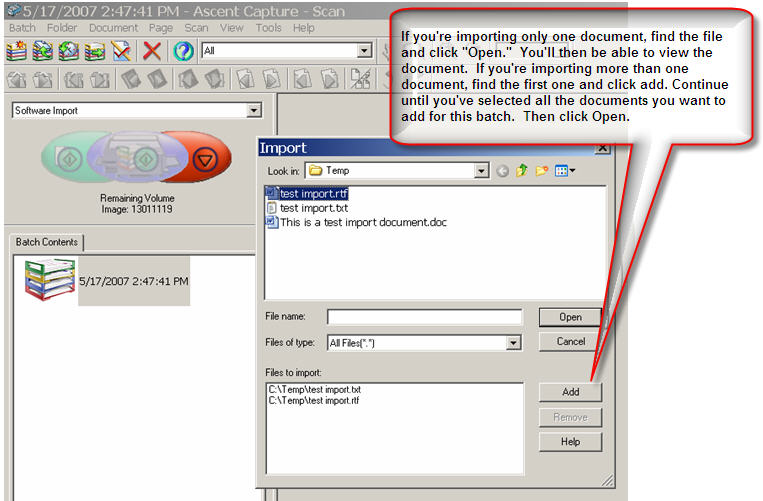
Click "Open” when done selecting the file(s) to be imported. You'll now be able to view the docs you've imported, just like when you can view documents that you just scanned. You can choose to delete them or rotate them now, just like scanned documents.
When you're done, close the batch and validate the batch as normal.
|
Note: If you select a Word document to import, you must have Word installed on the scan PC to be able to view it. A user must also have Word installed to view it later. |
If you want to import full emails, most email programs allow you to save an email as a .doc file. You must first convert your email to one of the text formats before importing. See your email program's help menu for instructions on how to do this. In Groupwise, open the email and choose File> Save As... and save it to any directory on your computer. Groupwise allows you to save an email as a Word (.doc) file. Outlook allows you to save an email with Word or Notepad.
Or, if you only want to import part of an email, you can copy text and paste it into a Word document. However, if you do this, it can delete or alter original information, such as the "to", "from", and "cc" fields, the date and time stamp, text wrapping, and other formatting. Once the email is in a text format, you can import it using the instructions above.
In general, email documents should be give a document code of UCOR - Uncategorized correspondence if they cannot be given a specific document code. See sections 1.5 for more information on document codes.
This page last updated in Release Number: 13-01
Release Date: 03/07/13
Effective Date: 03/07/13