|
|
Electronic Case File Handbook Release 18-01 March 28, 2018 |

|
|
Electronic Case File Handbook Release 18-01 March 28, 2018 |
2.7.1.1 Using the Batch Manager to Validate
2.7.1.2 Using the Validation Module to Validate
2.7.3.1 Example of a Scan First Batch Validation Panel When a DTS Is Used
2.7.3.3 Example of a Scan First Batch Validation Panel When a DTS Is NOT Used
2.7.3.4 Example of a Scanned Document With an Unknown Number
2.7.8 Set, Override, or Add to Document Assignment
2.7.8.2 Override Assignment (If Available)
2.7.8.3 Add To Assignment (If Available)
2.7.9 Editing Documents in Validation
2.7.10 Printing From The Validation Panel
2.7.11 Default Toolbar Settings in the Validation Panel
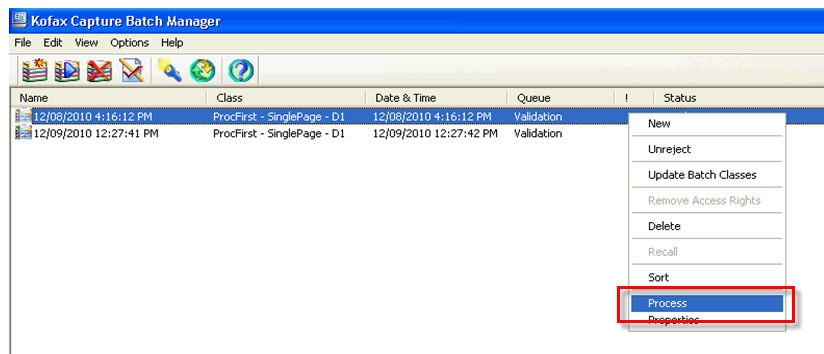
A batch can be processed in two separate ways. It can be done using Batch Manager as well as Validation Module. Processing a batch directly from the batch manager allows you to validate one single batch at a time. Processing a batch from the validation module will allow you to sequentially validate multiple batches that are ready in the validation queue.
Select the batch to be validated and right click on the batch to be validated and then choose the process option. This opens up the custom validation panel and the user can now enter all the index information.
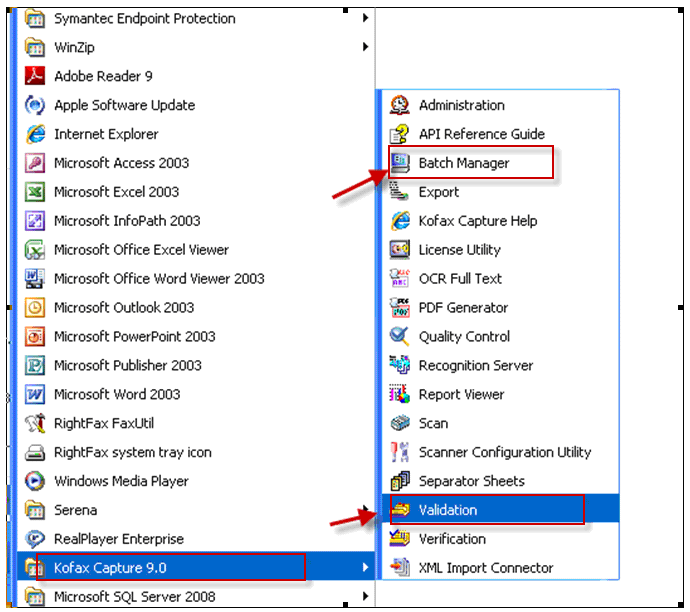
To open the validation module, go to Start>Programs>Kofax 9>Validation. When the validation module is started, the Open Batch window will be opened by default. This window contains a list of the all batches that have been scanned and are ready for validation.

Highlighting one of the batches and clicking "OK" will open the batch for validation. Clicking "cancel" will close the window. Clicking "Refresh" will update the list with new batches that have been scanned since the window was opened.
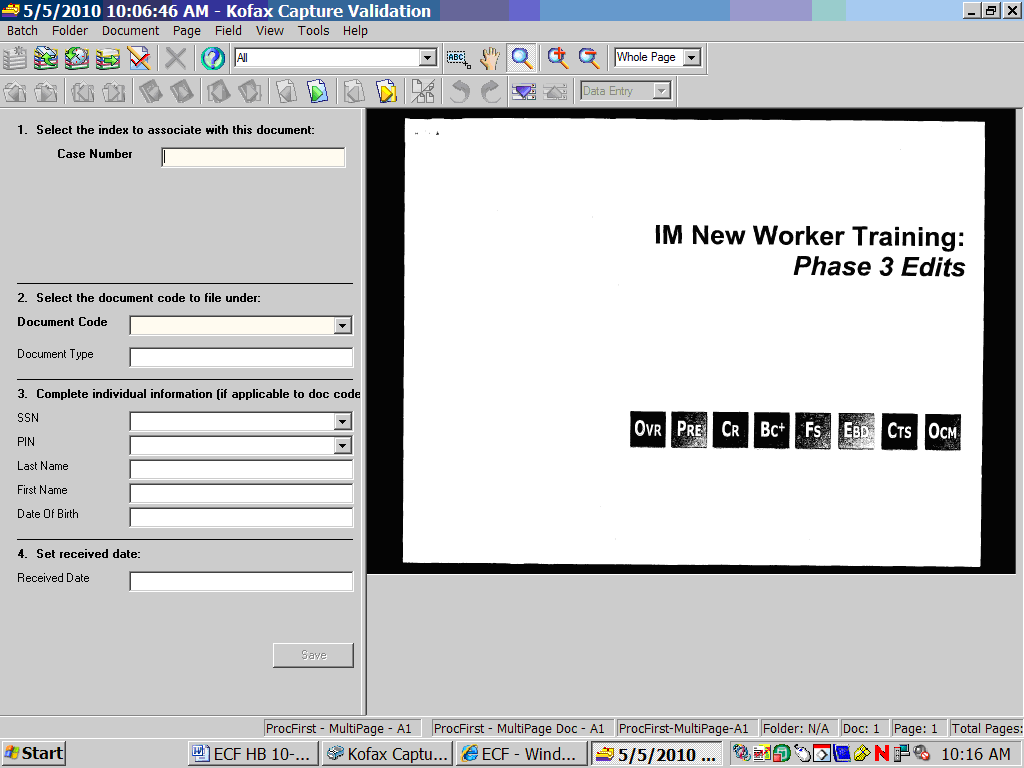
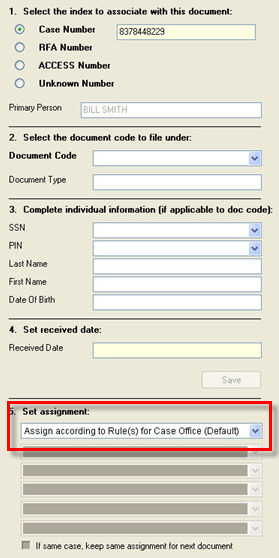
When a batch is opened, the first document in the batch is displayed on the right side of the screen. The left side of the screen contains entry fields for index information.
The system will start with the cursor in the Case Number field. After entering a value into an entry field, the TAB key is used to proceed to the next field.
When the "Process First” Batch Class is used, the Validation Panel allows the user to validate documents only for CARES Case Numbers. The scanner may continue to put documents from different cases in the same batch using the Process First batches and you must know the case number for each document.
Example of a Process First Batch Validation Panel
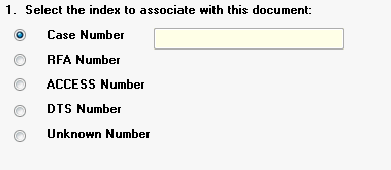
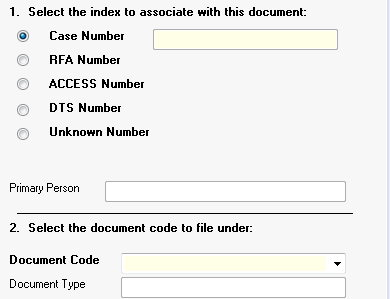
When the Scan First Batch Class is used, the Validation Panel allows the user to validate documents for a(n):
|
 |
Also, when the Scan First Batch Class is used, the Doc Code and Doc Type fields are not required. If the user does not provide a Doc Code/Type, the batch class will default the Doc Code/Type to "UN - Unknown”. This Doc Code/Type is not available to the user to select in the panel. If a particular document has "UN - Unknown” as the saved Doc Code/Type, the panel will display the Doc Code/Type dropdowns without a selection.
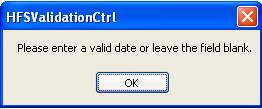
For this batch class, the received date is a required field. The received date must be valid and a date greater than 01/01/1970 but less than or equal to the current date.
Users can validate documents to the following criteria:
CARES #- using the 10 digit number or the number followed by a "C",
ACCESS Tracking # - using the 10 digit number or the number followed by a "A",
RFA - using the 10 digit RFA or the RFA followed by a "R",
DTS (Document Tracking Sheet) Number, or
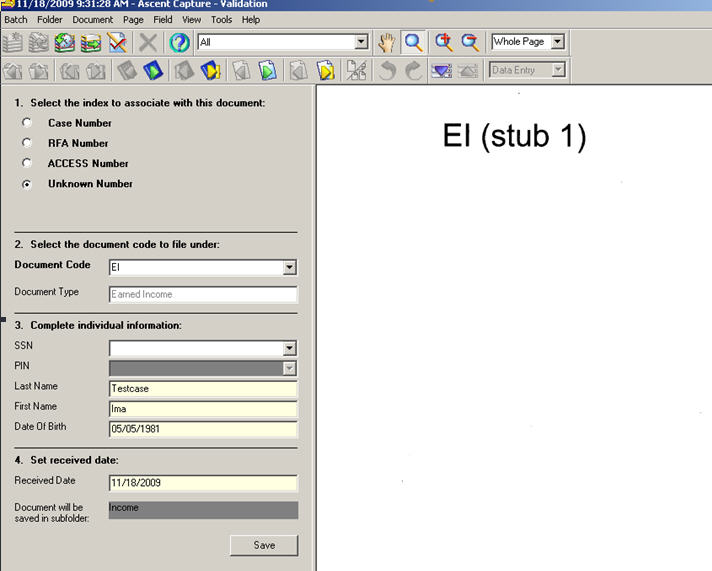
Unknown - If "unknown" is selected, it is assumed the scanner operator doesn't know the CARES, ACCESS, or RFA number for the document(s) in this batch.
All documents in the batch must belong to the same person.
If selected, the user must supply the Last Name, First Name, and Date of Birth (DOB) of the individual.
The SSN field is optional.
The Received Date field will be the same for every document in the batch.
The Case, RFA, and ACCESS numbers will show up as "0000000000"
If you enter an ACCESS or RFA number that has already been associated with a CARES number, the number will revert to the CARES number.
Prior to the saving the first document, the user can toggle between "Case/ RFA/ ACCESS Tracking Number/DTS Number” and "Unknown”. When the user changes this selection prior to the first save, all of the fields below are wiped clean and reset. After the first save, the Validation Panel locks the user into validating documents exclusively for either Case Numbers, RFA Numbers, and ACCESS Numbers OR for an Unknown Number.
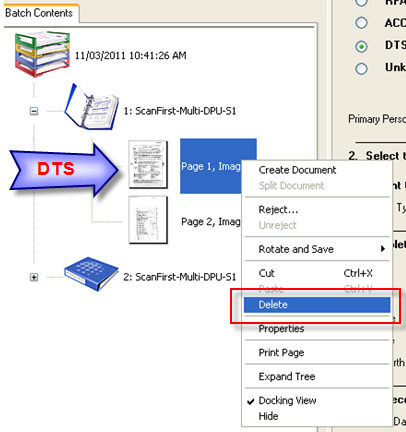
Note that DTS' are deleted and not saved in the ECF. See 2.7.3.2 below for instructions.
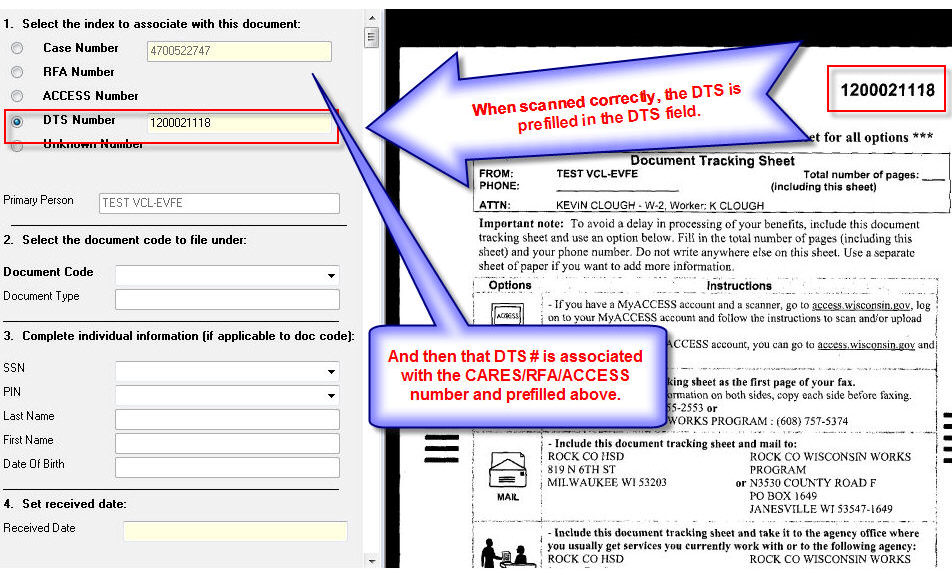
When a DTS is used, the DTS number is prefilled in the DTS Number field.
The DTS associates the document with either the Case Number, RFA, or Access Tracking Number and one of those numbers is pre-filled also.
The Primary Person is prefilled.
Start validating by entering the Doc Code (if known) and complete any other required fields.
Click Save when done.
Close the batch to continue. Once a completed batch is closed, the RSA will submit the batch to the CWW within a half hour. See 2.9 Uploading
Images.
|
Note: Any DTS number which is auto recognized by the OCR software in Validation and is 9 digits gets automatically prepended with zeroes since the DTS field needs to have 10 digits. If the DTS number does not get auto recognized, the worker needs to manually add a zero at the beginning of the DTS Number so that it becomes 10 digits. |
Since we don't save the DTS itself in the ECF, you will delete it. Follow these instructions to delete the DTS:
|
 |
|
 |
|
 |
|
 |
|
 |
After that is done, the first document of the batch will appear and is ready to be validated.
When a customer faxes a document with a DTS, a fax batch is created with a behind the scenes "Fax Batch Class" in Kofax. Users will never see the fax batch class in the Scan Module of Kofax. When a customer faxes documents using a Document Tracking Sheet (DTS), the documents will go to the Centralized Data Processing Unit (CDPU, or sometimes just "DPU") to be processed, if the case is in a non-Milwaukee County. If the case is in MilES, the fax batch is sent to the Milwaukee DPU.
The Validation Panel allows the user to validate documents for a given Case Number, ACCESS Tracking Number, RFA Number, DTS Number or First and Last Name.
For more information, see the Process Help Ch. 45.6. Note that only IM Workers with a WAMS ID can access the Process Help.
For information on how a customer faxes documents, see the ACCESS Handbook Ch. 14.1 and 14.2.
When the “Fax” Batch Class is used, the Doc Code and Doc Type fields are not required.
If the user does not provide a Doc Code/Type, the batch class will later default the Doc Code/Type to “UN – Unknown” and the user can tab past the blank doc code field.
The received date field will be blank and disabled because the date the fax was received is known.
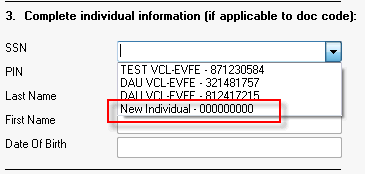
When an individual-level document type is selected, the PIN and SSN dropdowns will include an additional option with the description “New Individual”. This value allows workers to indicate the document is for an individual that is not on the Application, RFA, or Case. When this value is selected, the panel will default the SSN and PIN fields with zeroes and leave the Name and Date of Birth fields blank.
If the RFA or ACCESS tracking number is used as the index number, and it is now associated with a case, then both numbers are saved as part of the document and both are visible in the ECF. If the document is not yet associated with a case, the document will be scanned under an RFA or ACCESS tracking number. Since documents scanned by this panel must be given a case number, documents scanned under an RFA or ACCESS tracking number will be assigned to case “0000000000”.
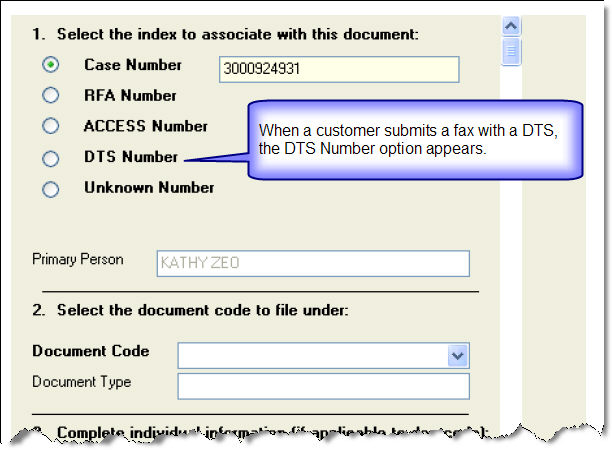
If a DTS is used, the first document to show up in the validation panel with a fax batch class is the DTS. This will not be saved in the ECF but at this point, it should be used to verify that the DTS was correctly input in the DTS field. This DTS number is associated with either the CASE or ACCESS Tracking Number.
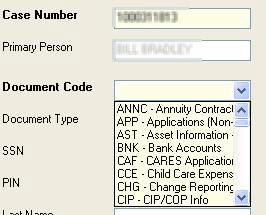
Document code is a required field for Process First batches only. For Scan First batches, this may be left blank if you want the worker to determine the type of document you're scanning. There are over sixty different documents within the Electronic Case File system. All valid documents have been provided in a dropdown list. Select the document code from the list, and press the TAB key. Entering letters in the dropdown list will scroll the list to the first code in the list beginning with that letter.
For example, if the documents is a Shelter/ Utility Expense (SUE), entering ’"S" scrolls the list to the first document code beginning with "S”. Entering " SU’"scrolls the list to the SUE entry. When you TAB out of the Document Code field, the Document Type field will be filled in for you automatically.
A complete list of document codes and document types is found in 1.5 ECF Document List.
There are two different classifications of documents. After Case Number and Document Code have been entered, the remaining fields to be entered will depend on whether the document has been classified as PIN Specific , or Non- PIN specific . The system will automatically take you to the correct entry fields depending upon a documents classification.

If a document is classified as PIN specific , such as a Proof of Identification (ID), the SSN, PIN, Last Name, First Name, and Date of Birth must be provided. In order to assist with this entry, a drop down list is provided for the SSN field. This dropdown will contain a list of everyone who is a part of this case. Select the person this document is associated with, and press the TAB key. The system will automatically fill in the remaining fields.
If you do not have the SSN, but you have the PIN, a similar dropdown is provided in the PIN entry field. These fields also contain the individual’s name, so even if you do not know the PIN or SSN, you can still pick the correct person based on name.
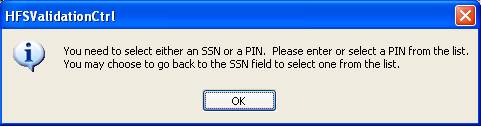
If a document type is classified as PIN specific, and you attempt to bypass these fields, an error message is displayed.
Process First Batch Classes
Received date is an optional entry field. The field will accept valid dates in a number of formats, such as 09/28/04, 9/28/2004, etc. If you enter only the month and day, the system will default to the current year (09/28 = 09/28/2004). If an invalid date format is entered, an error message is displayed.
Scan First Batch Classes
The received date is a required field. The received date must be valid and be a date within the past 6 months or equal to the current date.
Make certain you TAB out of the Received Date field in order to highlight the SAVE button. Once all index fields have been entered, click "Save".
At this point, the next document in the batch will be displayed, and the Case Number will be pre-filled. If there are no more documents in this batch, a pop-up will display. Select "Yes" in the pop-up to save your entry.

The system will then display the Open Batch screen, and you may select the next batch. If there are no more batches to process, a pop-up will notify you.
Note: The ability for a scanner operator to Set, Override, or Add to a document assignment is determined by agency management. Managers can choose to disable these features by contacting DHS (managers should click on Contact Us to request this).
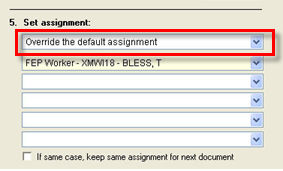
Case documents scanned using "Scan First" batches are assigned to workers and/or groups based on rules set by managers. The assignments can be changed by the scanner operator with the "Set Assignment" field. Only do this if instructed to by your agency managers. Details on these rules are found in Process Help 45.5 Document Routing Rules. In general, you will accept the default setting in the Set Assignment field so that the rules of your office will automatically route the document to the appropriate worker and/or group.
You may only change the Set Assignment field if the Scan First batch is used and the Case Number is known. You will not be able to change the Set Assignment field if you scan to an RFA Number, ACCESS Number, or Unknown Number.
To Override the rules, click on the dropdown box in the Set Assignment field and choose "Override the default assignment." Choose the worker or group you want to assign the document to in the next dropdown box. You can also enter a Worker ID, if it is not listed in the dropdown. You may enter up to 5 workers or groups to assign the document to.
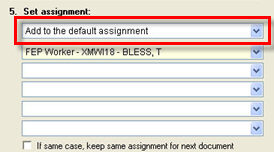
To keep the default document routing rules and add a worker (or workers) or group (or groups) that will be assigned the document, choose "Add to the default assignment" in the Set Assignment field. Then choose the worker (s) or group(s) you want to also assign the document to in the next dropdown box. You can also enter a Worker ID, if it is not listed in the dropdown. You may enter up to 5 workers or groups to assign the document to.
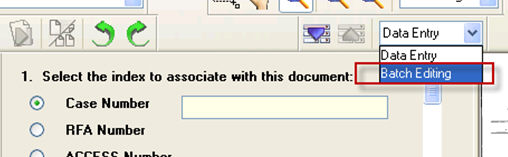
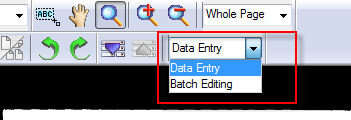
In the Validation Module of Ascent Capture (Start> Program Files> Ascent Capture 7> Validation) you will notice a dropdown box that says "data entry” under the zoom level dropdown box. You will now be able to rotate documents in Validation using the rotate arrows.
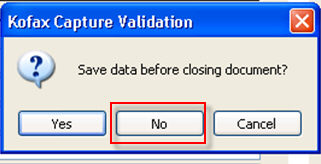
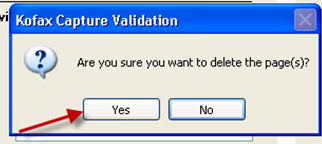
If you find a page or document that should be deleted, change the "data entry” option to "batch editing.” A red X now appears in the toolbar. Use the green "next page” or "previous page” arrows to move between documents in your batch. If you need to delete a document, go to that document and then select the red X to delete it. Continue Validation until you’re done with the batch.
Note that when moving from "data entry” to "batch editing” you will be prompted to save the data you may have entered in the fields. Regardless of what you choose on these prompts, you will lose any data you have typed in Validation for the document you’re working on. Simply retype the data after rotating or deleting pages.
The "right click menu" when hovering over the document and page navigation left vertical tab provides two print options.
The print would be sent to the default printer setup using the printer preferences of that particular machine.
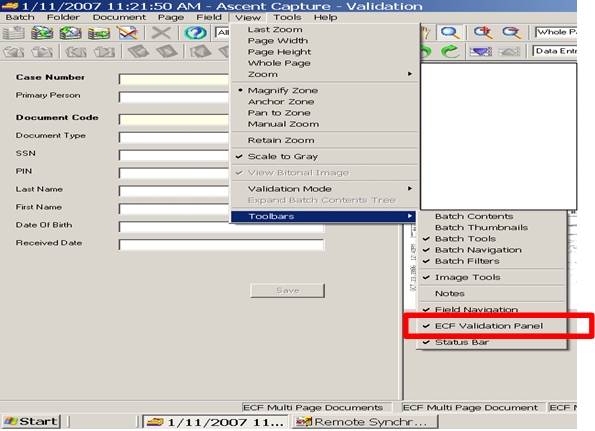
On rare occasion, a system error may change the view settings in Validation so that you can't see the fields to enter data. To change the view settings in Validation back to the default, click on View>Toolbars and make sure there is a checkmark next to "ECF Validation Panel." Compare your settings with the screenshot below and make any other changes to your toolbar setting so they match the screenshot.
This page last updated in Release Number: 11-07
Release Date: 12/16/11
Effective Date: 12/16/11