|
|
Electronic Case File Handbook Release 18-01 March 28, 2018 |

|
|
Electronic Case File Handbook Release 18-01 March 28, 2018 |
2.6.2 Start the Kofax 9 Scan Application
2.6.3.1.1 The Centralized Document Processing Unit (CDPU)
2.6.3.1.3 List of Batch Classes
2.6.3.2 Scanning with the Document Tracking Sheet (DTS)
2.6.3.3 Using the DTS with Separator Sheets Examples
2.6.3.4 Using the Flatbed Scanner
2.6.3.5 Watch for Missed Documents
2.6.5.1 Batch Tools—These buttons on the toolbar provide an easy way to perform batch functions.
2.6.5.2 Image Tools—These buttons are used to pan and zoom images.
2.6.5.3 Batch Navigation—These buttons allow you to browse through pages of a document in a batch.
2.6.9 Starting the Validation Module
 Training Note: If you are an IM worker, you may receive credit for taking ECF-related training courses in the DHS IM Learning Center. Log in and search for either of these two training courses. Both courses require speakers or a PC headset for the audio.
SCANNING DOCUMENTS IN THE ELECTRONIC CASE FILE (ECF) or
CENTRALIZED DATA PROCESSING UNIT (CDPU) FOR ELECTRONIC CASE FILE (ECF) TRAINING
Prior to scanning documents, you must perform startup procedures on the scanner at least once per day. It is recommended that at least once a day, a basic maintenance inspection is performed on the scanner.
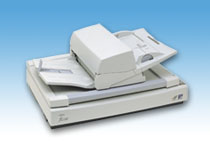
The two most common scanners at the county offices will be the Fujitsu 5750C and the Fujitsu 4220C scanner. A user manual is provided specific to the scanner that has been installed. Manuals are also found at 3.1 Fujitsu Scanner Documentation. Please refer to your user’s manual for the proper startup and basic maintenance procedures.
Each scanner is connected to a PC. This PC will be referred to in this document as the Scan Station. It is important that the scanner is powered on before the Scan Station is started. Let the scanner warm up (about 10-15 seconds) before turning on the Scan Station. Once the scanner is warmed up and readied for the day, and the Scan Station has been started, scanning can begin. Log onto the Scan Station with your network login id.
A Scan Icon ![]() should be present on the desktop of the Scan Station. Double click on this icon to access the Kofax 9 Scan module. If there is no icon on the desktop, follow the procedure below.
should be present on the desktop of the Scan Station. Double click on this icon to access the Kofax 9 Scan module. If there is no icon on the desktop, follow the procedure below.
From the Windows "Start” menu select Programs> Kofax Capture 9.0 > Scan.
The main window of the Kofax 9 Scan module will appear. Functional details of all the buttons on the screen are contained later in this document.
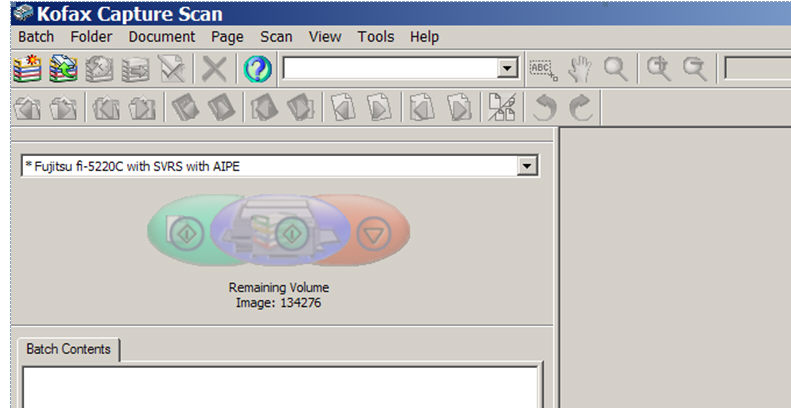
There are a number of options available to connect the scanner to the scan module. These appear in a drop down box in the upper left side of the screen. For the ECF scan application with the 5750C scanner, this should read
![]()
If the application is not set to this value, or if you are using a different scanner, please select the appropriate entry from the drop down list. Always make certain you pick the entry where your scanner model name is followed by the words "with SVRS with AIPE."
Since the most common function of the Scan Module is to "Create Batch , " the application will automatically start with the "Create Batch" screen, shown below. If it doesn't start automatically, choose "Batch> New" from the Scan Module.
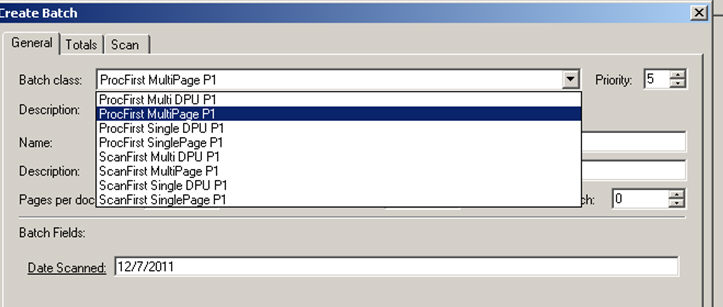
Choose the appropriate Batch Class from the "Batch Class" field and click Scan.
The Kofax 9 Scan application uses the concept of a "Batch Class". Batch Classes direct how a document is scanned and where the document goes after scanning and validation. The scanner operator chooses a batch class after starting the Scan Module and before scanning a document.
There are 8 batch classes and they have different properties for the documents being scanned. The scanner must choose one of the 8 different batch classes each time a document batch is scanned.
There is a Centralized Document Processing Unit (CDPU , also known as the DPU) that receives most mailed in verification items from all agencies except Milwaukee MilES. The CDPU also receives faxed, self-scanned and uploaded documents via ACCESS for non-Milwaukee cases. Milwaukee MilES maintains their own DPU and will scan and validate all documents from MilES cases. In general, the term "DPU" is used for the central DPU.
The CDPU will also validate documents that are scanned in the local agencies if a DPU batch class is used. Agencies may opt to scan and validate documents received at their agency by using one of the non-DPU batch classes below.
There are 4 batch classes that are used for documents that will be validated at the CDPU (the batches with "DPU" in the name) and 4 batch classes for documents that will be validated at the local agencies. The DPU batch classes were introduced in November, 2011.
Scroll over the batch names to find out what it all means.
The original batch classes are below. These batch classes can continue to be used if agencies want to scan and validate documents at their own agency.
ProcFirst MultiPage P1
ProcFirst SinglePage P1
ScanFirst MultiPage P1
ScanFirst SinglePage P1
The new DPU batch classes are below. These batch classes are used by staff at the CDPU or by agencies that scan documents at the agency but want them validated by the CDPU. Note that each one contains the abbreviation "DPU."
ProcFirst Multi DPU P1
ProcFirst Single DPU P1
ScanFirst Multi DPU P1
ScanFirst Single DPU P1
Scanner operators are still given the option to use the Scan First or Process First options with their documents. This is determined by the separator sheets and the batches the scanner operator uses. However, all agencies are encouraged to use Scan First batches.
ProcFirst batch classes are for those documents that have been reviewed and processed by a CARES IM worker before being scanned. You can only validate a ProcFirst batch to a known CARES Case number.
ScanFirst batch classes are for those documents that are being scanned right as they come into an agency. They are not seen or processed by a CARES IM Worker before being scanned. You can validate one of these batches to a CARES Case number, RFA, DTS number, or ACCESS number.
Single vs. Multi Page Documents
DHS has purchased a volume license with the scanning software. If we exceed the limit of scanned images, we could be charged more. Normally, a one sided document counts as 2 scanned images instead of one (the blank back page is scanned and counted). For this reason, when you are scanning documents, please separate out the single, one-sided documents from the multi page or duplex documents so that the back page of a single page document isn't counted against the volume license.
Single Page Documents
When you scan the single page documents, choose one of the single page batch classes from the drop down list box in the Scan Module of Kofax. There is no need to use separator sheets for these batch classes. The scanner should only scan the front side of each document. If the back page isn't being deleted automatically, see 2.13 Fine Tuning Scanner Settings.
Multi Page Documents
When you're ready to scan the multi page documents, from the Scan Module, change the batch class type to one of the multiple page batch classes. Now you should use the separator sheets to separate out different types of documents. Note also that a single page document with information on the back is considered a multi page document.
There are four separator sheets now.
Process First batches validated at the agency (the ProcFirst MultiPage P1 sheet)
Scan First batches validated at the agency ( the ScanFirst MultiPage P1 sheet)
Process First DPU batches validated at the DPU (the ProcFirst Multi DPU P1 sheet)
Scan First DPU batches validated at the DPU (the ScanFirst Multi DPU P1 sheet)
See 2.4 Document Separator Sheets for details and instructions on printing them. Choose the appropriate one for your agency and batch. Note: you must not use any of the old separator sheets (e.g. ECF Multi Page). Throw away any separator sheets that do not match any of the four above.
|
Example 1: Case A has the following documents to be scanned:
The person scanning is in an agency that scans first before the IM worker reviews the documents. She will separate out the documents into 2 classes:
1) Scan First Single page batch class documents: The shelter form and the note. No separator sheets are necessary.
2) Scan First Multiple Page batch class documents: The check stubs go behind one ScanFirst MultiPage P1 separator sheet and the lease goes behind the other ScanFirst MultiPage P1 separator sheet. The check stubs all go together because they are for the same person on the same job. The lease is a duplex document.
|
Note: The check stubs are one-page and one-sided so they could be put in a single page batch class also. However, by putting them behind a separator sheet and using a multi page batch class, these images will appear together in the ECF viewer and it will be easier for the viewer to see that these all belong together. If they're scanned as single page batch class documents, they will appear separately for the viewer and require more mouse clicking to see all the images.
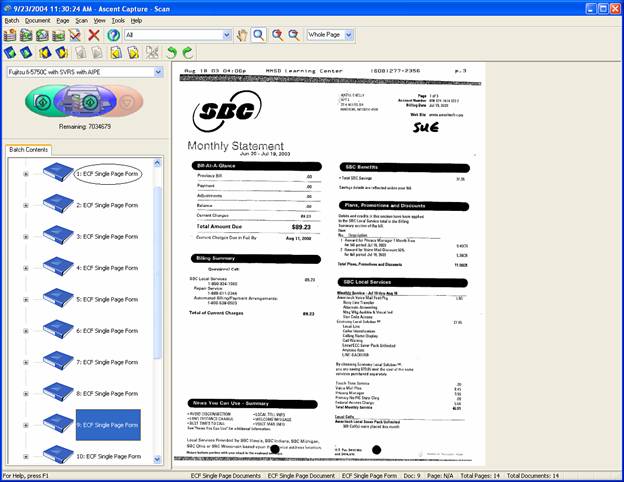
Here's an example of the scan module after scanning several documents in a batch. The blue book icon in the left panel represents a document. The current document is displayed on the right side. Click on the plus sign next to a blue document icon to see the contents displayed on the right.
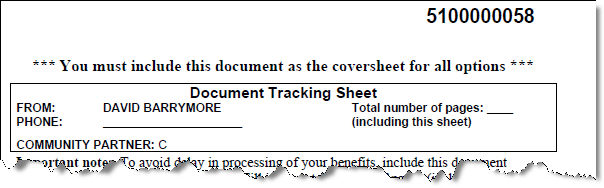
A Document Tracking Sheet (DTS) is a cover sheet sent with the Verification Checklist from CARES or printed out from ACCESS. (See PH 45.6.2) It is used by a customer when faxing documents to the ECF. Customers are also instructed to include the DTS with paper verification that is mailed in. Effective in December of 2011, the verification checklists that are generated by CARES will include a return address for the Centralized Document Processing Unit (CDPU , or DPU) for non-Milwaukee cases. For MilES cases, the return address will list the Milwaukee DPU.
Continue to use separator sheets as necessary to separate out documents belonging to the same case. See 2.4 Document Separator Sheets and 2.6.3.1 Batch Classes. The DTS contains a unique number in the upper right corner that brings forward case information to the validation panel. The DTS number is read by OCR (Optical Character Recognition) software that associates the documents after the DTS with the CARES/ACCESS number.
When scanning using a DTS, only use the ScanFirst Multi P1 Batch Classes and Separator Sheets. The OCR software won’t read the DTS number for single page batch classes.
Abbreviations For Scanning
The following abbreviations and symbols are used:
DTS - The Document Tracking Sheet in a batch. A number following shows the number of the DTS within a batch. e.g. DTS1, DTS2
SS - Separator Sheet. A number following shows the number of the separator sheet within a batch. e.g. SS1, SS2
D - Document. A number following shows the number of the document within a batch. e.g. D1, D2, D3
, (comma) - A comma denotes a new document series within the same batch. e.g. a batch with a separator sheet, a DTS, and one document is SS1, DTS1, D1.
Rules For Scanning With A DTS
Never mix documents that you want validated at the DPU with documents that you want to validate at a local agency.
Always use a Multi Page Batch DPU Batch Class and Multi Page DPU Separator Sheet when Scanning using a DTS. Although it's possible to scan and validate a batch at the local agency with a DTS and without a DPU batch class, the DTS number will not be read in this situation.
When scanning using a DTS, the Separator Sheet should always be on top of the batch followed by the DTS. The order for scanning the docs is Multi-Page Separator Sheet 1/ DTS1/ Doc 1, Multi Page Separator Sheet 2 (if needed) / DTS2 (if needed) / Doc 2 (if needed), etc. Abbreviated, this would be: SS1/DTS1/D1, SS2/DTS2/D2.
Don't delete the DTS from the Scan Module. During Validation it may be needed in case there are errors with the OCR software and it needs to be researched. The Case/RFA/Tracking Number is listed on the bottom left of the DTS. CDPU staff should delete the DTS in Validation after the case information has been returned from CARES. There is no doc code for saving the DTS in the ECF.
| Example 2: A batch described as SS1/DTS1/D1, SS2/D2, SS3/DTS2/D3 is a batch that starts with a separator sheet, the first DTS, and the first document. This same batch is then followed by a separator sheet and the 2nd document. The same batch is followed by a separator sheet, the 2nd DTS, and the 3rd document. |
|
Example 3: The documents in example 2 could be broken out into three batches if the scanner wanted. In that case the batches would look like this:
|
| Example 4: A scanner operator received an envelope with a DTS and a one page document with nothing on the back. She will use the ScanFirst Multi DPU P1 separator sheet with the ScanFirst Multi DPU P1 batch class. The order of the documents is SS1/DTS1/D1. |
The default method for scanning is to use the Automatic Document Feeder ( ADF ). If you have a laminated card, or small, ripped, or wrinkled documents, you may want to manually scan documents using the flatbed scanner. This is the glass tray on the scanner that is visible by lifting the lid on the scanner.
|
Note: You must have a batch open when you change the settings to flatbed scan. |
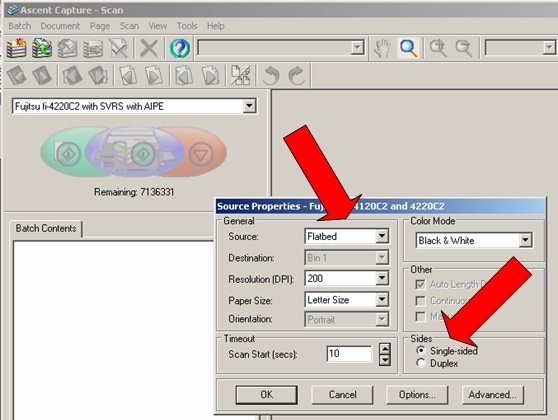
To change the setting on the scanner to use the flatbed, open Kofax 9's Scan Module.
You must have a batch created before you start.
The batch class should be "ECF Single Page Documents.”
Select Scan> Properties from the menu to bring up a dialog box.
From here, you'll see a pull down menu to toggle between ADF and flatbed scanning.
Change the setting to "flatbed." You will be able to scan manually now by placing a document on the flatbed.
Under "Sides" select "Single Sided." Click OK and proceed with scanning by clicking on Scan>Scan Page or "Start."
Once you are finished using the flatbed and close the batch, the settings will revert back to the default, which is the ADF duplex scanning option.
On occasion, the scanner may pull two documents through the ADF instead of just one. It's the responsibility of the scan operator to make sure that every document is scanned.
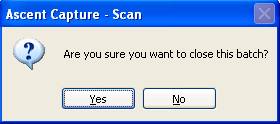
 Once a batch has been scanned, it must be "closed' in order to move to the next process (See 2.7 Validating a Batch). Clicking on "Batch" in the upper left of the screen provides a drop down list. Select "Close" to close the batch, and ’"Yes" when asked if you are sure. At this point, you may scan the next batch, or close the application.
A number of functions can be performed using the buttons on the toolbar at the top of the Scan screen.
![]() Create Batch - Click this button to bring up the "Create Batch" screen, and begin scanning a new batch.
Create Batch - Click this button to bring up the "Create Batch" screen, and begin scanning a new batch.
![]() Open Batch - This button may be used to bring up the "Open Batch" screen. This screen contains a list of all batches that are currently in process.
Open Batch - This button may be used to bring up the "Open Batch" screen. This screen contains a list of all batches that are currently in process.
![]() Suspend Batch - This button will temporarily suspend a batch. These batches can then be selected to complete processing by using the "Open Batch" function.
Suspend Batch - This button will temporarily suspend a batch. These batches can then be selected to complete processing by using the "Open Batch" function.
![]() Close Batch - Once a batch has completed, closing the batch will allow it to proceed to the validation station.
Close Batch - Once a batch has completed, closing the batch will allow it to proceed to the validation station.
![]() Batch Properties - This button provides statistics about the current batch, such as when it was created, and the number of pages and documents.
Batch Properties - This button provides statistics about the current batch, such as when it was created, and the number of pages and documents.
![]() Delete Batch - If a batch has been scanned, and you realize you do not want this batch (i.e. accidentally scanned the same batch a second time) use this button to delete the batch.
Delete Batch - If a batch has been scanned, and you realize you do not want this batch (i.e. accidentally scanned the same batch a second time) use this button to delete the batch.
![]() Help - Provides help for all tasks related to the scan application.
Help - Provides help for all tasks related to the scan application.
![]() Pan - In pan mode, click on the image and hold the right mouse button down. Moving the mouse allows you to pan across the image.
Pan - In pan mode, click on the image and hold the right mouse button down. Moving the mouse allows you to pan across the image.
![]() Zoom -In zoom mode, click on the image to zoom in.
Zoom -In zoom mode, click on the image to zoom in.
![]() Zoom In - Click this button to zoom in on an image.
Zoom In - Click this button to zoom in on an image.
![]() Zoom Out - Click this button to zoom out from an image.
Zoom Out - Click this button to zoom out from an image.
![]() Previous Document - Go to the previous document in a batch.
Previous Document - Go to the previous document in a batch.
![]() Next Document - Go to the next document in a batch.
Next Document - Go to the next document in a batch.
![]() First Document - Go to the first document in a batch.
First Document - Go to the first document in a batch.
![]() Last Document - Go to the last document in a batch.
Last Document - Go to the last document in a batch.
![]() Previous Page - Go to the previous page in a batch.
Previous Page - Go to the previous page in a batch.
![]() Next Page - Go to the next page in a batch.
Next Page - Go to the next page in a batch.
![]() First Page - Go to the first page in a batch.
First Page - Go to the first page in a batch.
![]() Last Page - Go to the last page in a batch.
Last Page - Go to the last page in a batch.
![]() Rotate the Image 90 degrees left.
Rotate the Image 90 degrees left.
![]() Rotate the Image 90 degrees right.
Rotate the Image 90 degrees right.

Many of the features available on the toolbar can also be found using the dropdown on the menu bar. These dropdowns also contain some additional functions.
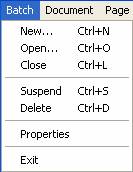
The features on the batch menu function the same as toolbar buttons. Open, Close, Suspend, Delete, and Properties are exactly identical to their counterparts on the toolbar button. Select New… to create a new batch.

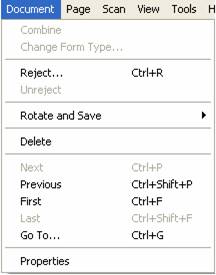
The document menu provides functions that allow you to navigate through documents in a batch, and in some cases edit the contents of documents.
Combine - This function allows you to select pages from the batch contents list that have been scanned as separate documents, and combine them into the same document.
Reject - This allows you to reject a document from a batch, and attach a note why it was rejected. This may be done if there are problems with the document, such as poor scan quality. Rejected pages may be retrieved and viewed at a later time, and are not deleted from the system.
Unreject - Brings a document back from reject status.
Rotate and Save - Allows you to rotate a document right or left, and save the document in that state.
Delete - Deletes the document from the batch. Deleted pages are gone, may not be retrieved at a later time.
Next, Previous, First, and Last are identical to the toolbar buttons, and allow you to move from document to document within a batch.
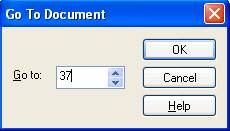
Go To - Allows you to go directly to the nth document in the scan list.
Properties - Displays the properties box.
The page menu allows you to navigate through, and edit pages in a batch. It is similar to the document menu, except the functions are performed at a page level rather than a document level.
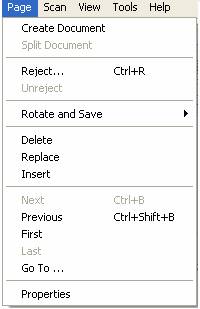
Create Document - Allows you to select one or more pages from the batch contents list, and create a new document from these pages.
Split Document - Allows you to select a page within a (multi-page) document, and split the document in two beginning with that page.
Reject - Allows you to reject a single page, without rejecting all pages within the document.
Unreject - Brings a page back from rejected status.
Rotate and Save - Allows you to rotate a page right or left, and save the page in that state. This will not affect other pages in the document.
Delete - Delete selected pages
Replace - Will allow you to replace the current page with a new page. Select the page you want to replace in the batch contents list. Place the new page in the scanner, and then select "Replace" from the dropdown. The selected page will be removed, and replaced with the newly scanned page.
Insert - Works in a similar manner to replace; however this function will insert the newly scanned page(s) after the selected page in a document.
Next, Previous, First, Last, Go To… and Properties work in the same manner as on the Document dropdown, however at the Page level.
 The scan menu provides a number of scan options. An operator using our Electronic Case File application would not generally use many of these options. Only the options you may have a need for are described below.
Start - Starts the scan operation. This can only be used when a batch is open. You can use this if you want to scan additional images into the current batch.
Stop - Stops the current scan.
Scan page - Scans a single page.
The view menu allows you to change how images are displayed to you within the scan application.
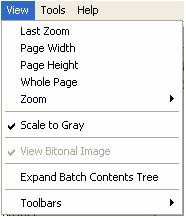
Last Zoom - Reverts the viewer back to the last zoom selected.
Page Width - Displays the image in the viewer so that the width of one page takes up the entire viewer.
Page Height - Displays the image in the viewer so that the height of one page takes up the entire viewer.
Whole Page - Scales the image so that the entire image fits in the viewer window.
Zoom - Provides a dropdown that allows the user to select various zoom percentages, or create a custom zoom.
Scale to Gray - Checking this feature enhances image contrast within the viewer.
Expand Batch Contents Tree - Fully expands the image list in the Batch Contents window.
Toolbars - Allow you to display or hide all of the toolbars within the scan application.

After a batch has been scanned, the content of the batch will display in the batch contents window. This window provides an organized view of the documents and pages within a batch. The tree view can be expanded or contracted as shown below.

Drop down lists similar to those available on the Scan Module Menu Bar are available by right clicking within the batch contents window.
|
|
|
|
|
Right Clicking on a batch displays the Batch Dropdown |
Right Clicking on a document displays the Document Dropdown |
Right Clicking on a page displays the Page Dropdown |
|
|
|
|
The validation process is used to enter index data for the scanned images. This index data identifies the images to the Electronic Case Folder so that case workers can retrieve the images when they are needed. It is critical that accurate index information is entered. If the index information is entered incorrectly, case workers may not be able to find the documents they need.
A Validation Icon  should be present on the desktop of the workstation. Double click on this icon to access the Kofax 9 Validation module. If there is no icon on the desktop, follow the procedure below.
From the Windows "Start” menu select All Programs > Kofax 9 > Validation.
The main window of the Kofax 9 Validation module will appear. The toolbar for the validation module is identical to the Scan toolbar.
This page last updated in Release Number: 12-01
Release Date: 03/30/12
Effective Date: 03/30/12